
After many years of building websites and optimizing for search engines, I thought it would be beneficial to offer a free tutorial on the methods used to build a WordPress website. Softwired has always focused on non-proprietary or open-source web design, which gives website owners the ability to edit their own content and work with any programmer of their choosing. In the early years, we built websites with both Joomla and WordPress but Joomla is no longer supported so it’s been all WordPress for the last few years.
Some of this information may be too technical in nature for a blog but we'll be working on the basic concepts and include links to the resources available for further instruction.
How to Build a WordPress Website
Step 1 - Pick a name for your website and buy a domain
Your website name should match your business name as closely as possible but it won’t be available in every case. Choose the best possible name for your website and then buy the domain name on a site like www.Domain.com.
Step 2 - Get a hosting account
It's absolutely critical that you host your website on a reliable service with a high quality of service. So many businesses invest thousands of dollars in a website and yet host with a cheap provider to save a few dollars. The price of hosting can vary, but it is almost always better to go with a local company with better service than a huge company with millions of accounts. Typically, servers run by large corporations are overloaded, which means your site will run more slowly and intermittently. A slow-loading website will hurt your SEO (Search Engine Optimization) efforts, especially now that Core Web Vitals are a ranking factor.
We offer preferred hosting and WordPress Pro support for our own customers and clients at reasonable rates! Click here to learn more.
Step 2 - Set up WordPress
Setting up WordPress is a process of downloading all the files from here: WordPress download page. Once these files are downloaded to your computer you will be uploading to a hosting account. If you have an account with Cpanel then you can use the File Manager to easily upload the files.

Now you want to upload the files to your hosting account:
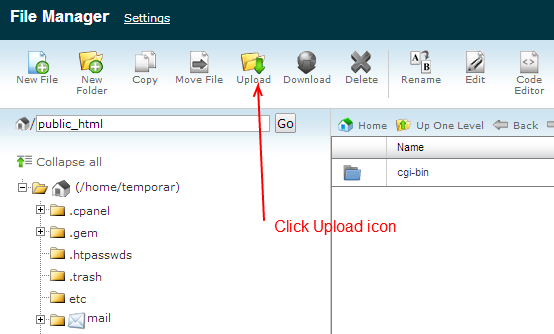
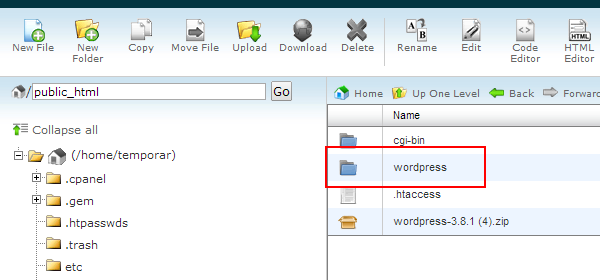
You'll open up a new screen and then browse to the file you downloaded from WordPress called wordpress-X.X.X.zip (X=versions). Once you've completed this step you will have the file manager like this:

Once the files are expanded, you'll see a new directory called wordpress. Then, navigate to the directory as you'll need to move the files back to the root of the website.
You should be able to select all the files and move them to the root:
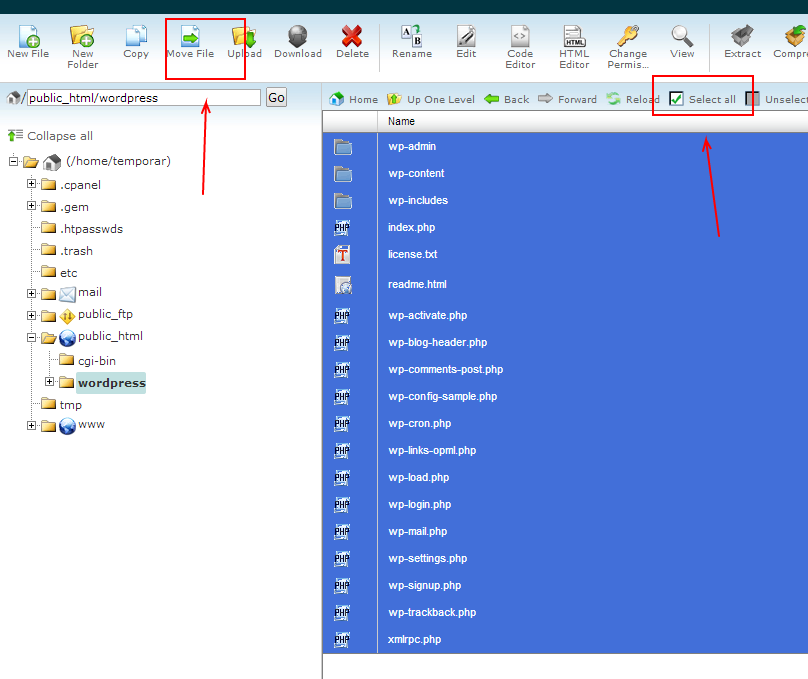
From the pop window you'll see a box where you'll move the file to. Change /public_html/wordpress to /public_html. (remove /wordpress)
Now you should be able to navigate back to the root of the website and you should see the files there like so:

At this point you can change the name of wp-config-sample.php to wp-config.php. Now you will need to set up the database so that WordPress can run once you've finished configuring the file.
Step 3 – Pick a WordPress theme
Visit https://themeforest.net/ to search for the perfect WordPress theme for your website. There are thousands of options, catering to different industries and needs. Themes are priced differently but most are between $12 and $50.
Step 4 - Choose WordPress plugins
You may find a great theme to work with that doesn’t have every function that you need built into it. That’s what plugins are for! Choose reliable plugins from sites like https://codecanyon.net/category/wordpress. Plugins will help with your site growth and help provide the user experience you are hoping to create. Plugins vary in cost.
Step 5 - Start creating your pages and blog posts
To create a page, simply go to your WordPress dashboard, and then Pages → Add New.
Every website should have some basic pages like Home, About, Services and Contact Us. You may also wish to add other pages such as a Store to sell goods online or a Portfolio of your best work. You will then need to add each page to your main menu (under Appearance in the dashboard) and place the pages in the order you want them. This is also where you will identify sub-pages.
We also recommend using your blog for sharing news or relevant articles. To create a new blog post, go to Posts → Add New from your WordPress dashboard. Make sure to add a title and featured image to each post.
Web Design Help
Now that we’ve got you started, contact us with any further questions! We have been building WordPress websites since 2006 and have the knowledge and resources to build the perfect website for your business.

Let Us Know What You Thought about this Post.
Put your Comment Below.